Tuesday, December 31, 2013

IO Quick and Simple Card Challenge

This little thank you card was super fast and easy.  I am submitting it for the Impression Obsession Quick and Simple Card challenge.

Very simple 4" x 4" thank you card for those very generous christmas gifts we received this holiday.  Here's my submission.


I used the following supplies:

  • IO Pine Branch Die
  • IO Cover a Card Nordic Stripes
  • IO Hydrangea Cling Stamp (sentiment)
  • Versamark 
  • White embossing powder
  • Versafine Crimson Red Ink
  • Ribbon
  • Bling
Thanks for stopping by.

Saturday, December 21, 2013

Knit CASology 75

Welcome friends:

I was MIA last week as I had some out of town guests.  All caught up now - just a couple of last minute Christmas preparations.

Okay so back to blogging and challenges - this weeks' CASology challenge is:


I was so impressed and inspired by the knitting done on Meghan's card so I thought I'd give it a try.  Knit a mini sweater NOT GONNA HAPPEN but a few stitches - I CAN DO THAT ...ha ha.  Honestly, I've been wanting to give mini knitting for cards a try and this was my window of opportunity :)

So here's my submission - I just love it  :)


The background stamp is cover-a-card by impression obsession called Nordic Stripes. Using ranger perfect medium, white card base was heat embossed using rich red e/p.  The mini knitting needles are tooth picks with crafting beads.  I casted on some stitches using crochet yarn and "ever so carefully" knitted a few rows.  To give my card a vintage feel I tied a couple of bows using cheesecloth and hemp cord.  Walnut stain was used to give my card an aged look.  The sentiment is from CTMH Captured Moments.  I am hooked, love the tiny knitting :)

Thanks for stopping by.

Monday, December 9, 2013

Christmas Tag Exchange

Tags, tags and more tags....my 12 tags are done and ready to go....almost a week early.

Here are a few close ups.  The poinsettias were cut from Spellbinders, the branch is IO and the deer is from Tim Holtz.  The deer is cut out of wood veneer and inked using tea die distress ink.  I love how these turned out.


Christmas Ribbon Tree

I had a couple of requests for directions for the ribbon tree that I made for CASology ribbon challenge.

This is what I followed - although I didn't measure my ribbon :)
I don't know who to give credit too as these same pictures and directions seem to be on a few websites.


1, Cut six pieces of 3/8″ (9.5mm) grosgrain ribbon: Two pieces that are 2.75″ (7cm), two pieces that are 2.5″ (6.35cm), and two pieces that are 2″ (5cm).
2, Fold and glue ribbons as shown
3, Glue longest loops on brown ribbon 
4, Glue 2.5″ loops as shown
5, Glue 2″ loops as shown.
6, Make a bow
7, Glue bow top to the tree

Sunday, December 8, 2013

Ribbon CASology 73

Hello Friends;

Phew made it just under the wire this week to play along with CASology weekly challenge.  Cue card this week is:


Yahoo this is one of my favourite card elements and I rarely make any cards without a ribbon or bow, even if it's for a guy...ha!.  For me ribbon is one of those "go to” elements that add that extra touch to any project and because there are so many varieties and so many beautiful patterns a small piece of ribbon can make a very bold statement.

So here is my submission.


Have you seen these little ribbon trees before?  There are tons of directions on pinterest for making them - easy peasy and especially cute clips in the hair of little girls or pinned on a sweater.  Keeping it CAS - my card base was embossed using provocraft "Flurries" embossing folder.  Sentiment is from CTMH "Say It With Style" stamped with versamark fine olympia green ink.  The ribbon tree is made using green and brown ribbon which was recycled from a previous gift package :). Yes I save scraps of ribbon....lol.  Gold ribbon is from recollections.

I am heading back to my craft room now to finish my 12 tags for a tag exchange.  This is the first year I've participated - it's okay to call me chicken...lol.  I will post a couple of pics later today..notice the amount of ribbon I used...lol.

Thanks for stopping by.
Trish

Friday, November 29, 2013

Shop CASology 72

Hello Blog Friends;

It's been so hectic around here  - lots to do for Christmas which seems to be getting closer and closer by the minute.

The best part of this time of the year is the amount of time I find myself spending in my craft room making cards, tags and other craft gifts for Christmas :)

This week over at Casology, the cue card challenge is:


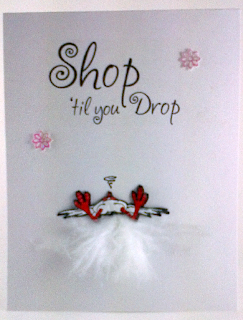
Oh my -- could this challenge be any more perfect for this time of year (especially since black Friday - only the biggest shopping day of the year was this week) - pure genius I say...ha.  So, I hope you get a chuckle and enjoy my take on this challenge.


The "Fainted Chicken" stamp is from Art Impressions.  I stamped it 3 times using black onyx versafine ink.  After coloring the beeks and legs with distress markers, I fussy cut 2 of the images.  They were then layered over my card base image with liquid dots.  The sentiment is a free digital stamp from birds cards blog.  I couldn't help but add some tail feathers....lol...and to make my card festive, some bling snowflakes.  Thanks for stopping by.

Monday, November 25, 2013

Wood Inlay Tags

Welcome blog friends:

I have to apologize for this very short post.  I just couldn't wait to share this very cool technique that I have been experimenting with. I stumbled on a tutorial (which I can't find right at the moment, but I will keep looking for it) whereby the tag was made using a piece of wood paper. Well I couldn't find any paper but did find very thin veneer.  Well it worked!  Shreek!  


A piece of very thin 1/32 birch wood veneer was die cut using a memory box die.  I carefully inked the die cut piece and then "inlayed" it back into the wood tag.  To keep the cut image from popping back out I covered the tag back with a piece of adhesive.  Distress inks were used to colour the die cut.  Please ignore the smudge that I got when stamping my sentiment.  I'll figure out a way to conceal that :) ha.

Ohhh I can't wait to try some more dies.  Here's another one.


Wednesday, November 20, 2013

Bell CASology 71

Hey blog friends:

Back today for another Casology challenge.  Before I get to my submission I just wanted to take a quick moment to thank all those who commented on my card for the last challenge - triangle.  It was such a wonderful surprise to receive and read all those comments - you are all such talented creative crafters....hugs to all.
Congratulations to the winners - beautiful cards!

Okay so this week over at Casology the challenge is:


If you've never tried these challenges -- you just need too!  There are so many wonderful, talented crafters.  The challenges are fun and really do help to keep those creative juices flowing.

So here's my submission.  


The card base was embossed using a Provocraft border embossing folder.  I stamped SU Alphabet Soup with versamark and heat embossed it with silver embossing powder.  My image was cut out using spellbinders circle die and matted with a scalloped circle of glitter paper. The glittery bow was cut with Mft Dienamics die.  Everything was attached with pop dots - luv pop dots.  This is so sparkly, I am really pleased with how it all came together.  
Thanks CASology for an another awesome challenge.

Thanks for visiting :)


Thursday, November 14, 2013

Triangle CASology 70

Hi there friends:

Trying another CASology challenge.  I luv these challenges :)

The challenge for Week 70 cue card: Triangle

Trying to keep it clean and simple, as you know, it's super hard for me...ha.  I used this stamp set that I purchased years ago from Michael's $1 bin.

I stamped it twice on white cardstock with versafine black onyx ink.   One image was fussy cut and shaped using a stylis to give it some dimension.  I wrapped bakers twine around the paper so it was tight.  The fussy cut image was then adhered using foam pop dots over the stamped image.  The black cardstock was cut using spellbinders A2 matting basics.

Clean and simple card to cheer up a friend.


Monday, November 11, 2013

Welcome

Welcome friends!

I thought it was about time that I create a place that I could share my cards and some of the tips/tricks and mistakes (haha) I've learned while crafting.

I hope that you will find my creations inspiring as well informative.

I'm pretty much a self learning crafter and get super frustrated when I can't figure out new techniques.  So, my plan is to keep my posts fun but still educational and informative.  There may even be a video (no promises) and/or step by step instructions.

So let's get started, I am a very proud doggie mum to a very smart and handsome golden boy and happily married wife of 20 years to my high school sweetheart :)  when I'm not training and showing Luke, I can be found in my craft room making cards and creating gifts to share with my family and friends.

My cards have a tendency to be 'over the top' so creating clean and simple cards (CAS) are very challenging for me.  I keep telling myself that 'less is more' but my Gemini twins take over and create not soo simple cards...lol.

I luv, luv, luv splitcoaststampers for their weekly challenges, posts, forums and educational techniques and am always inspired and blown away at the talented crafters that post here, check it out.  I sometimes post my own creations on SCS and am thrilled and proud to have been a weekly favourite and a weekly CAS favourite  :)  Just recently I have been attempting the weekly changes at CASology and was an honourable mention YAHOO!

Ok so lets get craftin' :)